
Updated September 2026: this guide was first published in 2018. We’ve updated it for Google’s current testing tools and guidelines. The core method, adding JSON-LD schema with Google Tag Manager, still works today.
How To Get Schema Markup Set Up On Your Site
Schema markup and structured data help Google understand exactly what is on your pages. They aren’t a direct ranking factor, but they can earn your pages rich results (like star ratings, prices and event dates) that improve your click-through rate, and they make your business easier for AI search tools to understand. In this guide we cover what schema markup and structured data are, how to add basic markup to your website, and how to add dynamically generated schema markup for more on site complex items using Google Tag Manager.
Browse By Step. Click on any of these links to jump to the step you want to see:
What is Schema Markup?
How To Add Schema Markup
Dynamically Generated Schema Markup
- Generate a Basic Product Schema Using JSON-LD
- Setup A New Account in Google Tag Manager and Create Your First Tag
- Choose a Trigger to Make Your Tag Fire
- Setting Up User-Defined Variables
- Custom Javascript Variables
- Place Variables Into Custom HTML Within Tags
- Test Your Tags In Preview Mode
- Test Schema Markup With Google’s Rich Results Test
What Is Schema Markup?
In a nutshell, schema markup is code that can be added to your website to give users more informative and useful results in search engines. By adding schema markup to the pages on your website you give Google and therefore Google’s users more info about what your website offers.
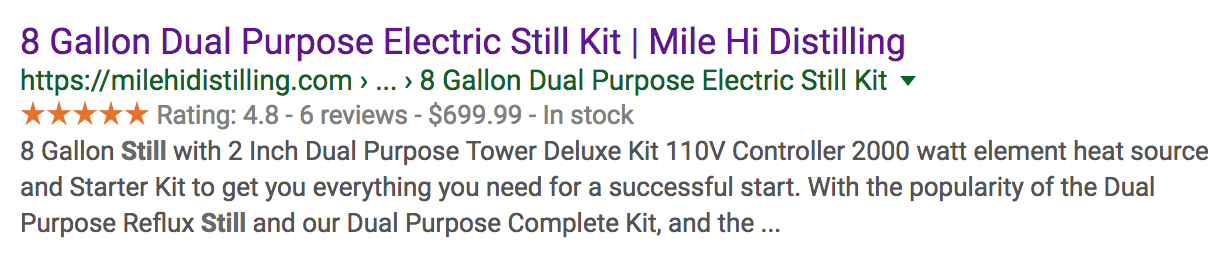
Things like recipes, products, reviews, events, articles, business data, photos, videos and much more can be marked up using schema. As a result, your site will stick out more in the search results and have a better click through rate. Below are a few examples of search results that have added schema markup and therefore contain more relevant data to help the user.
Recipe Schema Markup

Event Schema Markup

Product Schema Markup
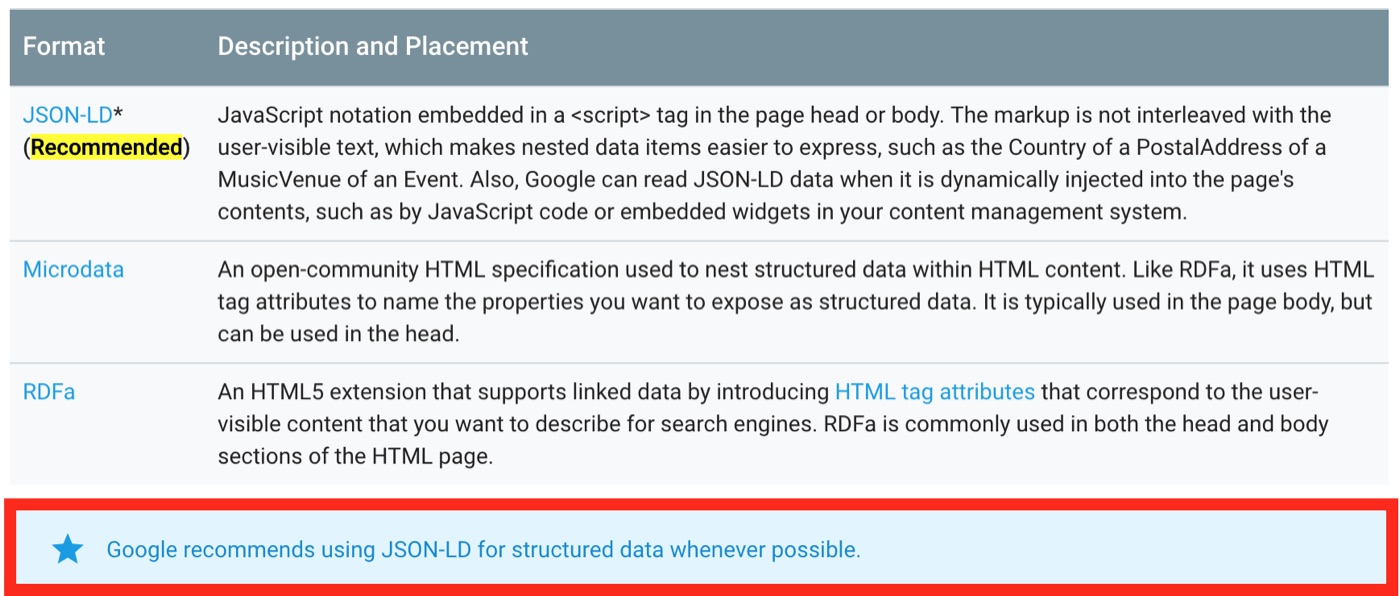
Schema markup can be implemented using Microdata, RDFa, and JSON-LD. Each of these has it’s pros and cons, however for this guide we will be utilizing JSON-LD rather than those other two. It is very user friendly and Google recommends using it whenever possible.
How To Add Schema Markup
Since there are a number of different ways to add schema markup to your site it can seem like a confusing issue. You can create the code and add it manually to each page or use schema markup plugins. Today, SEO plugins like Yoast SEO and Rank Math automatically add the core schema most sites need, such as your organization, website, breadcrumbs and articles. You can also use Google Tag Manager to add schema markup automatically whenever the page is viewed.
We use a combination of these different plugins and also Google Tag Manager to markup our websites with schema and structured data. In the lower half of this post, we’ll be covering in more specific detail, how we use these two techniques to add dynamically generated schema markup.
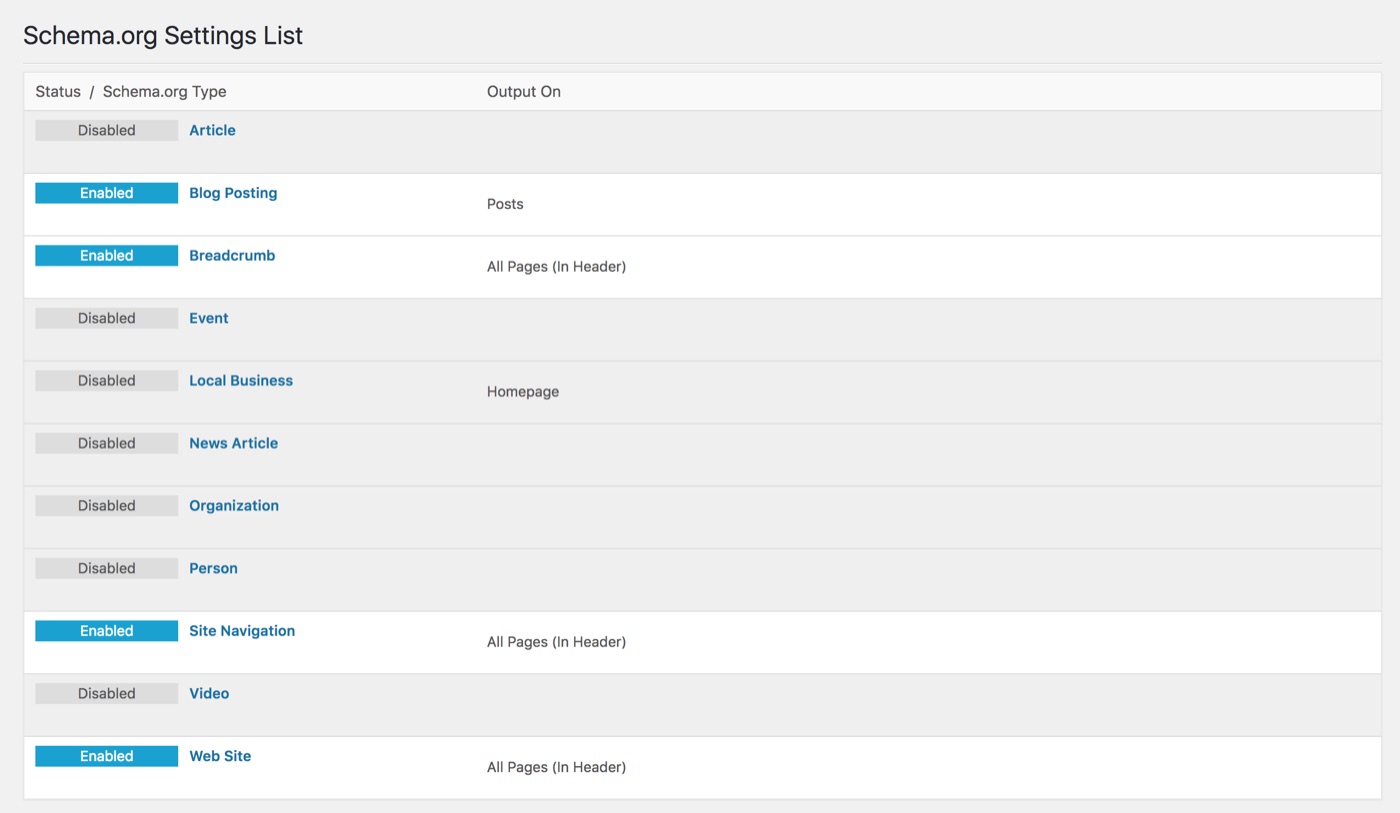
Since there is a lot of unchanging data on your website that you should markup with schema, you’ll want to use a no-hassle plugin to get the job done. Due to its simple design and ease of us, we use the Markup (JSON-LD) structured in schema.org plugin. This plugin will allow you to markup things like your website data, articles, events, local business, breadcrumbs and much more. We only use it for a few static things for our sites.
2026 note: plugins come and go. If you already use Yoast SEO or Rank Math, start with the schema settings built into them before adding another plugin.
Markup (JSON-LD) structured in schema.org
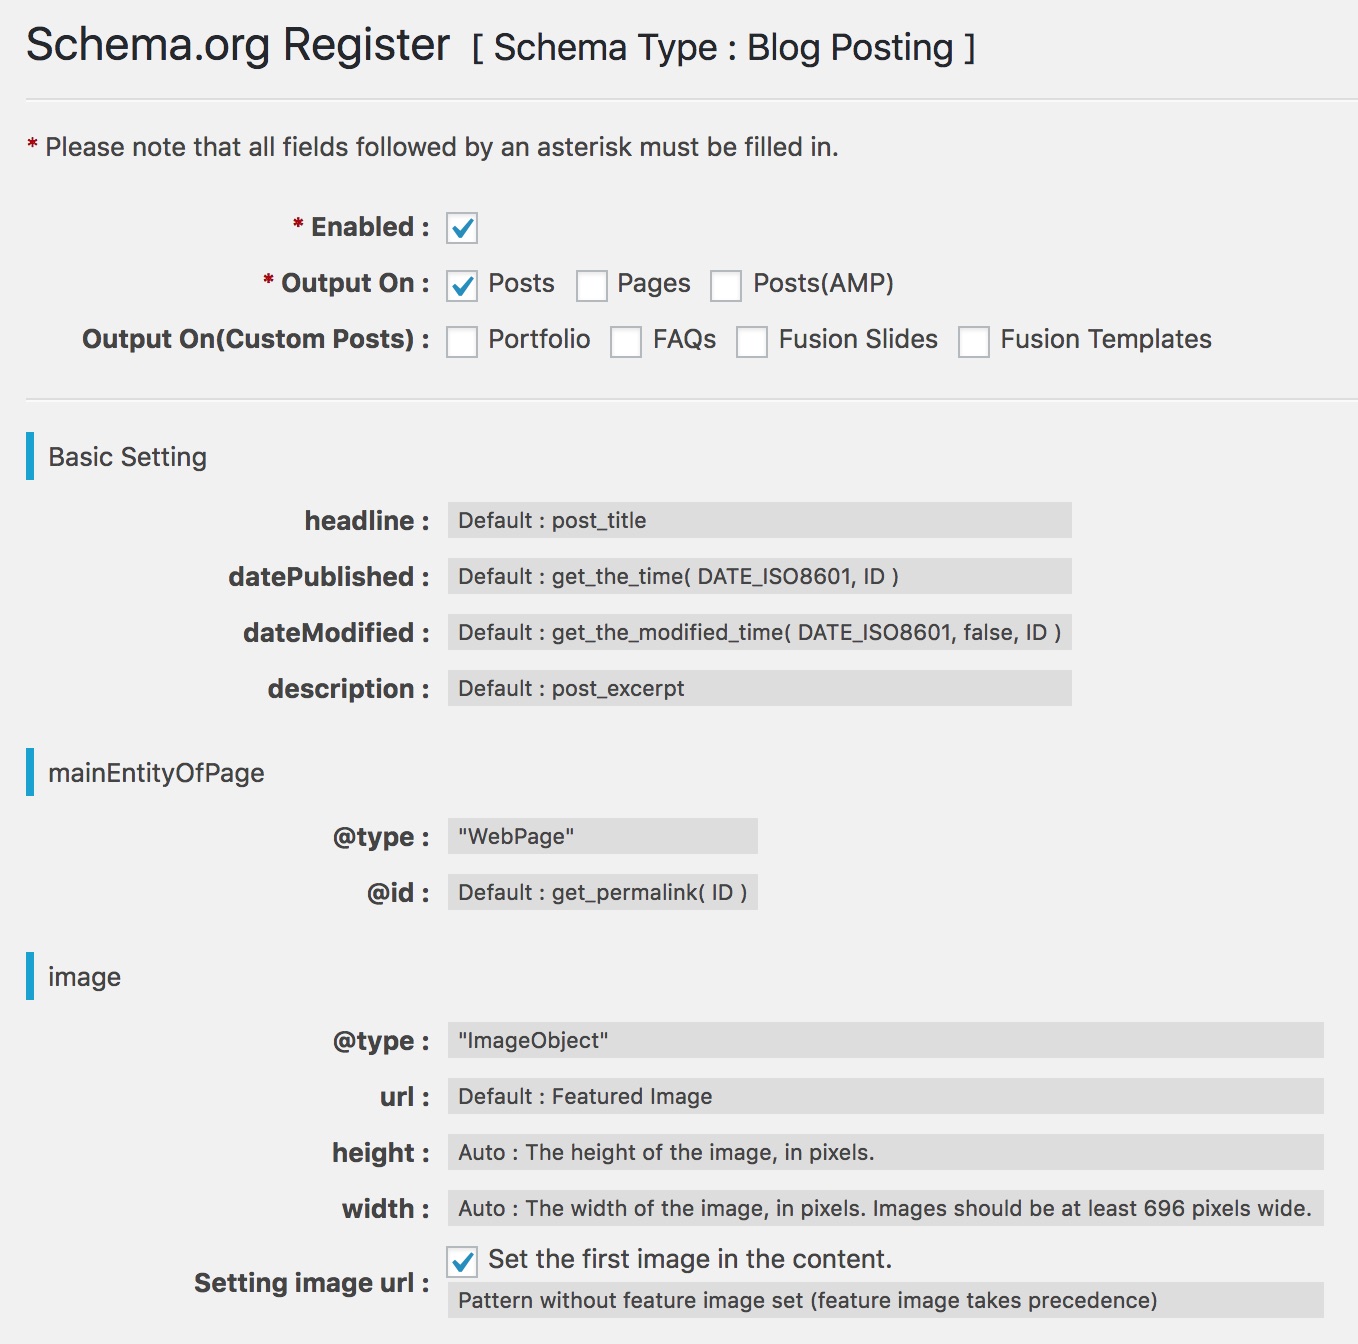
Blog Posting Schema Markup
We also recommend the WP Schema Pro Plugin. This gives you the ability to add schema across your site in a number of ways.
Dynamically Generated Schema Markup
What is dynamically generated schema markup and why is it something that you should use?
Manually adding the appropriate schema markup to each page on your website can be an arduous task, especially if you’re maintaining an e-commerce site with hundreds of products. Dynamically generated schema markup is achieved by automatically adding all kinds of different schema markups to your site when an event such as a page view occurs, instead of having to manually add JSON-LD code to each page on your site as you build them.
We utilize Google Tag Manager to dynamically generate schema markup on the pages of our sites using JSON-LD tags, firing triggers, and user-defined variables. If this sounds confusing now, hold tight. Below we’ll be explaining the steps involved in setting up a dynamically generated schema markup for all of the products on an e-commerce site.
Generate a Basic Product Schema Using JSON-LD
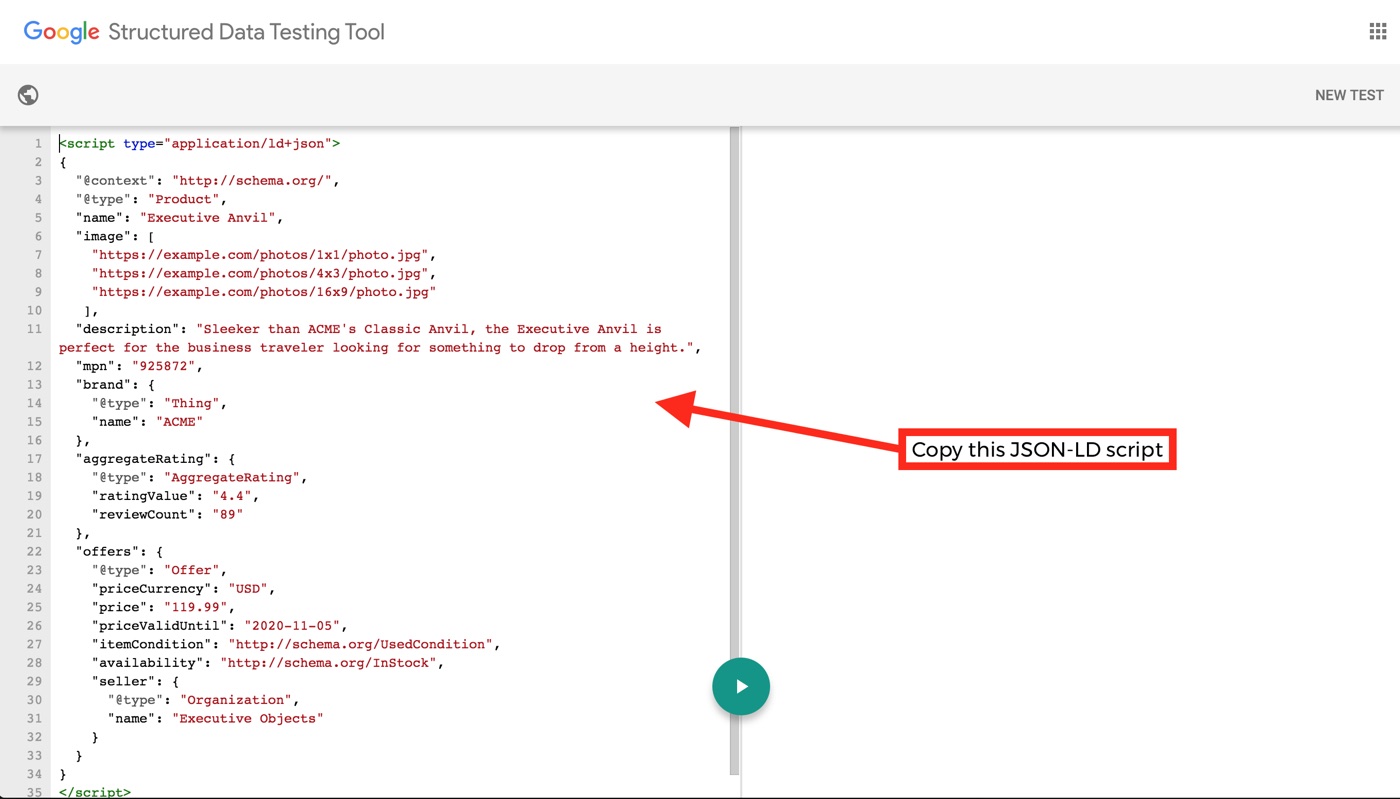
First we need to create a basic product schema that will contain relevant info for our site. You can find great templates for all of the different types of structured data and schema on Google’s developer site. For this example we’ll be using the product schema. Scroll down to the JSON-LD example for a single product page. This is a general template of a product schema that you can fill in with your own website’s data. Keep it handy, as we’ll be copying this code in a short time.
Product Template Schema Markup
Setup A New Account in Google Tag Manager and Create Your First Tag
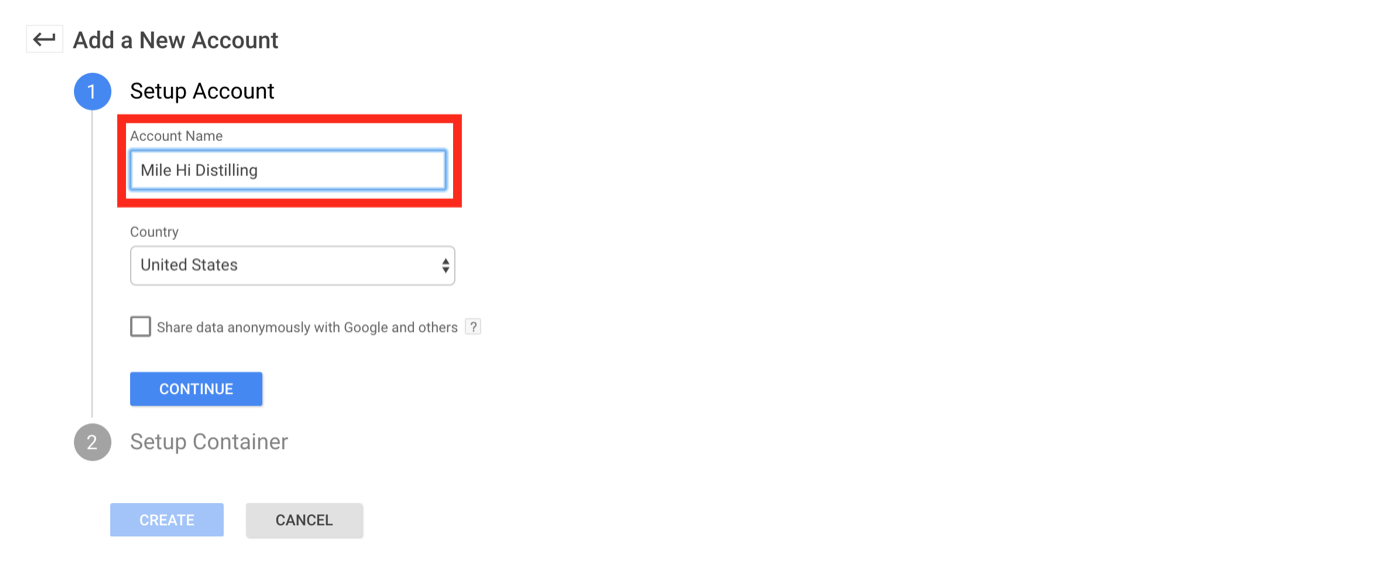
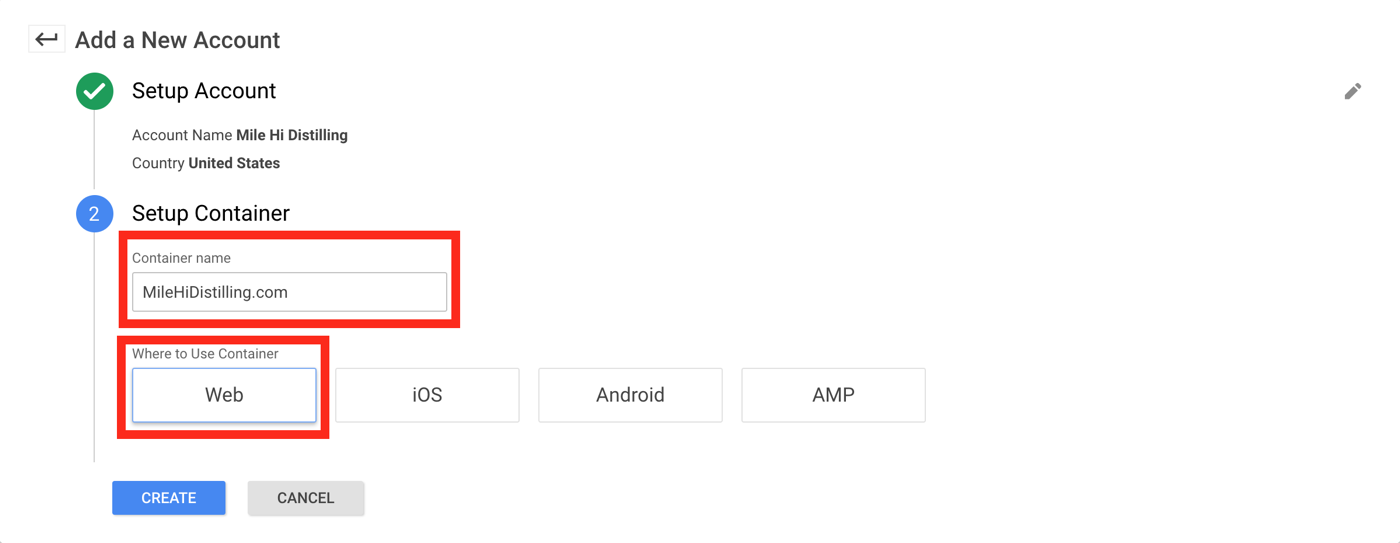
Head over to Google Tag Manager, then sign in with your Google account and create a new tag manager account (This is the web property that you want to add schema to). Give the account a name and set up the container with a name and the location that it will be used (your website’s URL). From there, you can set up your first tag.
Setup Account Name
Add Container Name
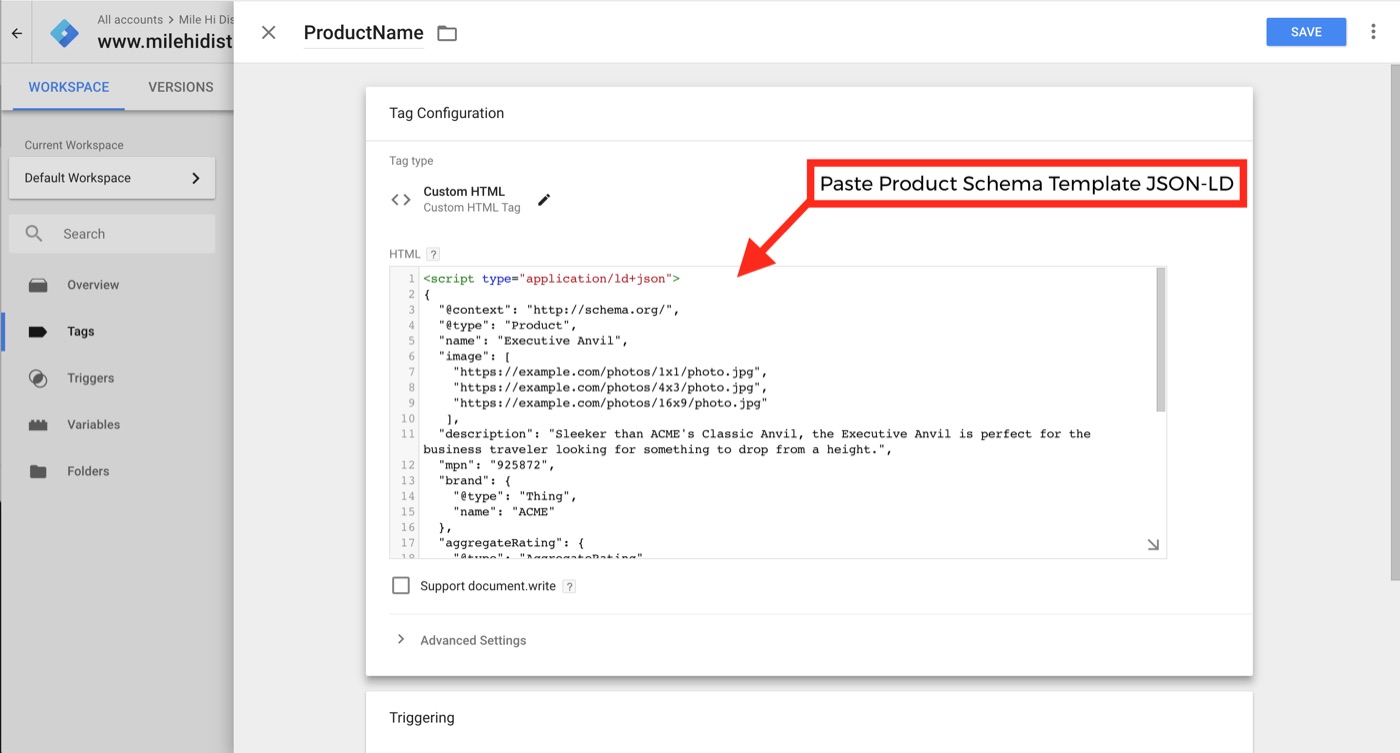
First, give your tag a name. Then you can specify the tag configuration. Google Tag Manager allows you to set up a number of different types of tags for different purposes, but for adding your product schema, you’ll just choose a custom HTML tag. This will open up an HTML textbox.
Remember that general JSON-LD product schema example from Google’s developer site? Copy that code into your custom HTML textbox. You’ll be changing out the default values in this code for user-defined variables in a few steps.
Tag Configuration
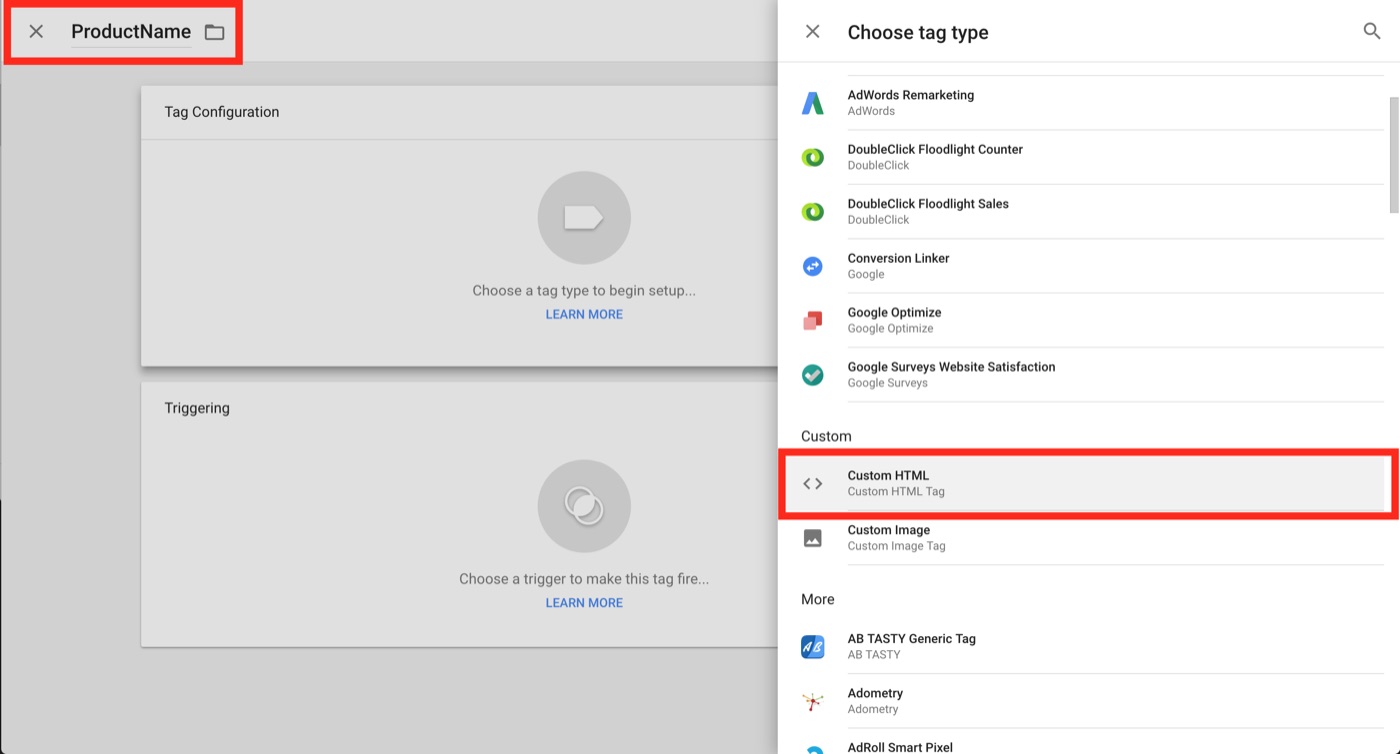
Custom HTML
Choose a Trigger to Make Your Tag Fire
Once you’ve chosen the HTML tag type, scroll down on the same page to choose a trigger type to make your tag fire. This trigger will signal to Google Tag Manager which circumstances or specific pages to add your schema tags to. Again there are tons of different triggers for different purposes, but for this case, you’ll want to choose ‘Page View.’ This will trigger your schema tag to fire every time a product page is loaded on your site.
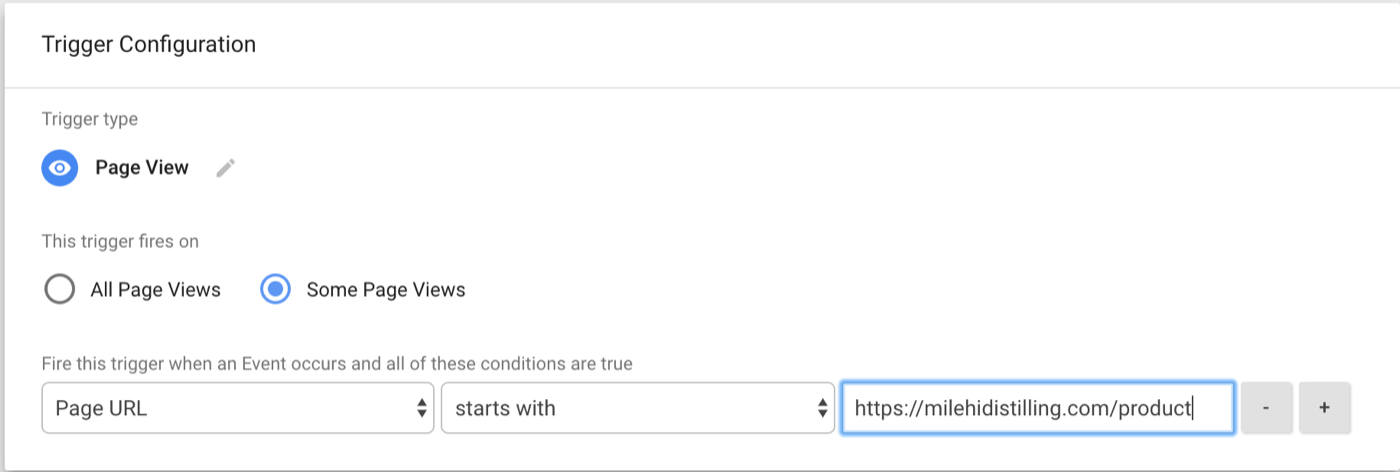
Since we only want this tag to fire on specific product pages, you’ll choose ‘Some Page Views’ and specify the conditions for the page view. In the example below, we’ve set the trigger to fire when a page view occurs with the specific conditions: Page URL > starts with > https://milehighdistilling.com/product. This will ensure that this trigger and product schema tag only fire on pages that contain product info.
Trigger Configuration
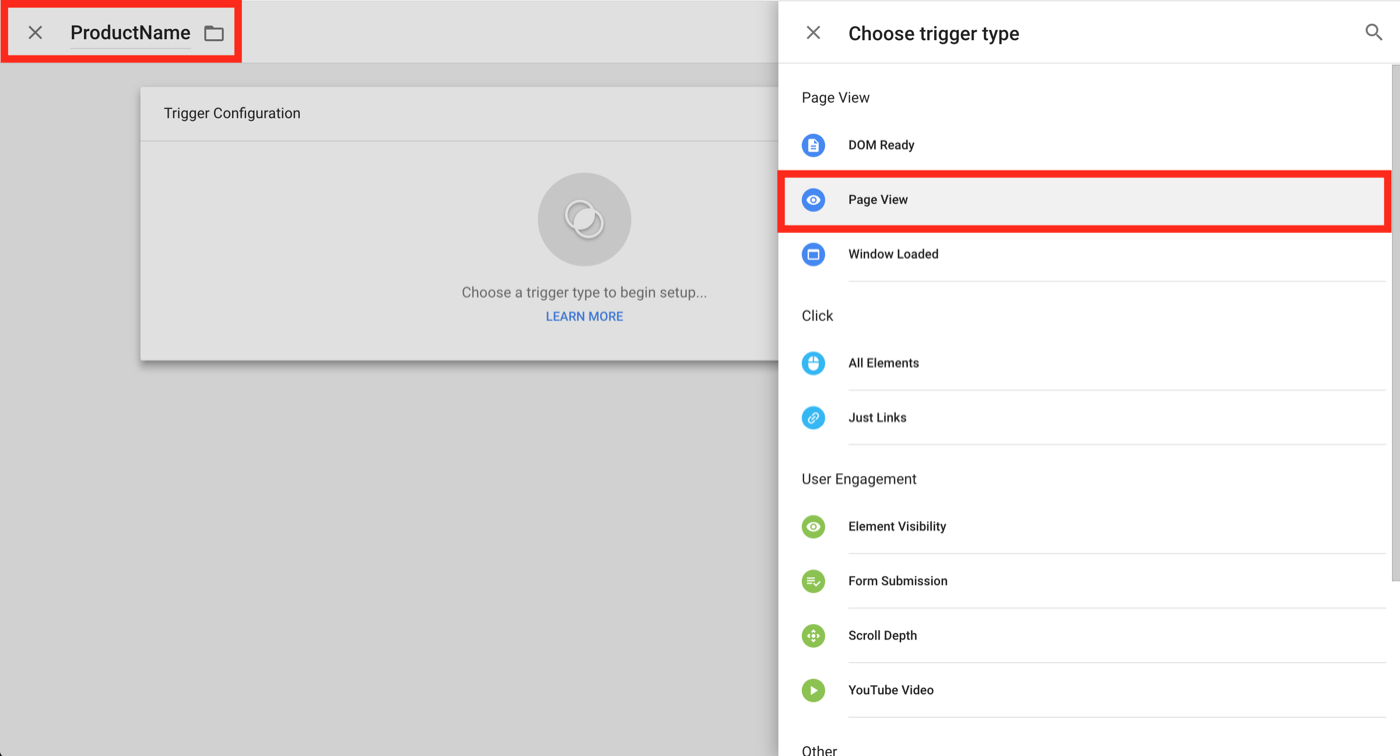
Page View Configuration
This is very important because like we mentioned before, you should only add schema markup to the on-page content that is visible to people who visit the web page. It’s a big no-no in Google’s eyes, to add irrelevant schema markup to content in hidden div’s or other hidden page elements. And since, the big G decides whether or not to show your schema markup in the SERPS results, we’d recommend making sure your schema markup is as clean as possible.
Setting Up User-Defined Variables
Setting up user-defined variables is especially relevant in creating dynamically generated schema markup for your site. These user-defined variables will be used to target specific on-page elements of your web page such as product name, price, description, reviews and much more.
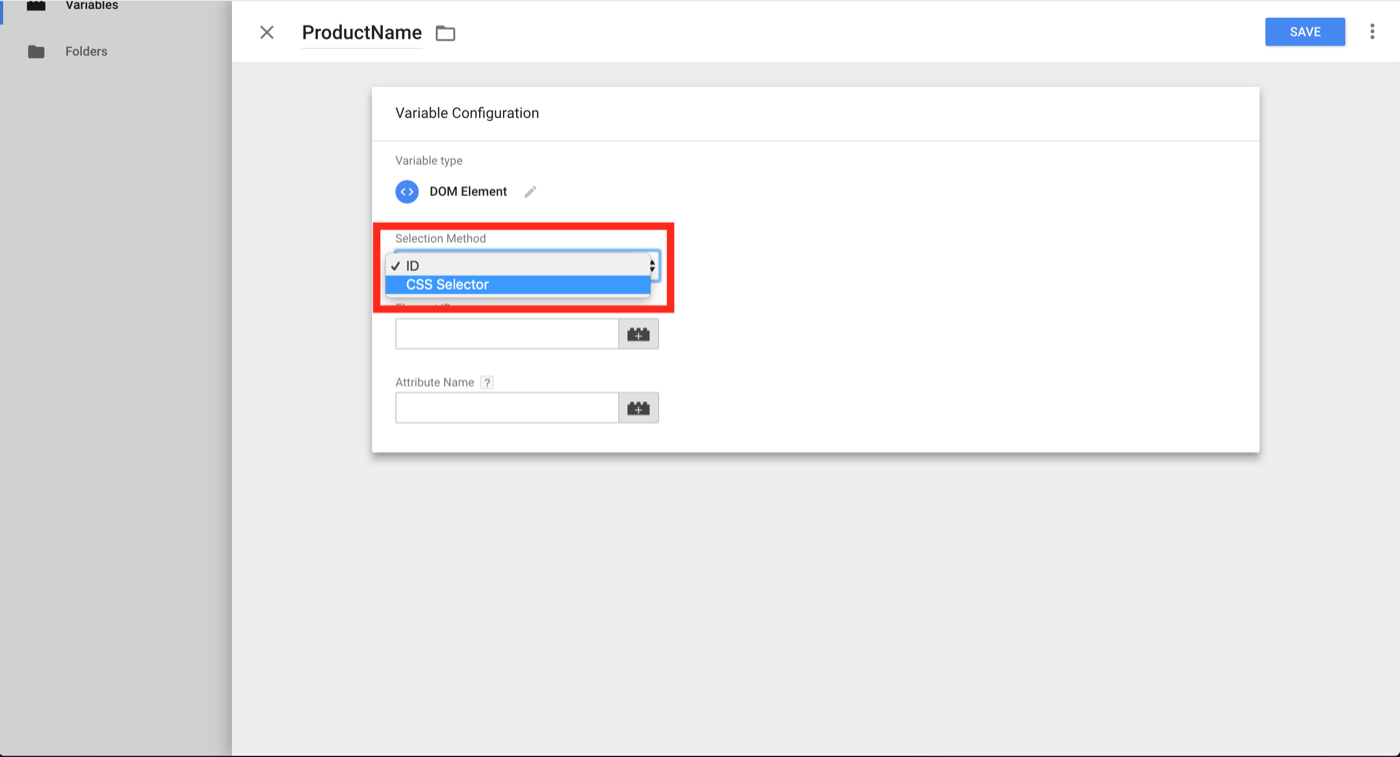
We do this by using the DOM Element and Custom Javascript variable types. First we’ll go through the DOM Element variable type setup, as this will be the variable type that you will use to target most of the on-page elements. For the example below, we’ve set the selection method to target specific CSS elements on the page that we are adding the schema markup on. In addition, we just need to find the correct corresponding element on the product page itself.
- Selection Method: CSS Selector
- Element Selector: (This will depend on what element you are selecting)
- Attribute Selector: N/A
DOM Element Variable Type
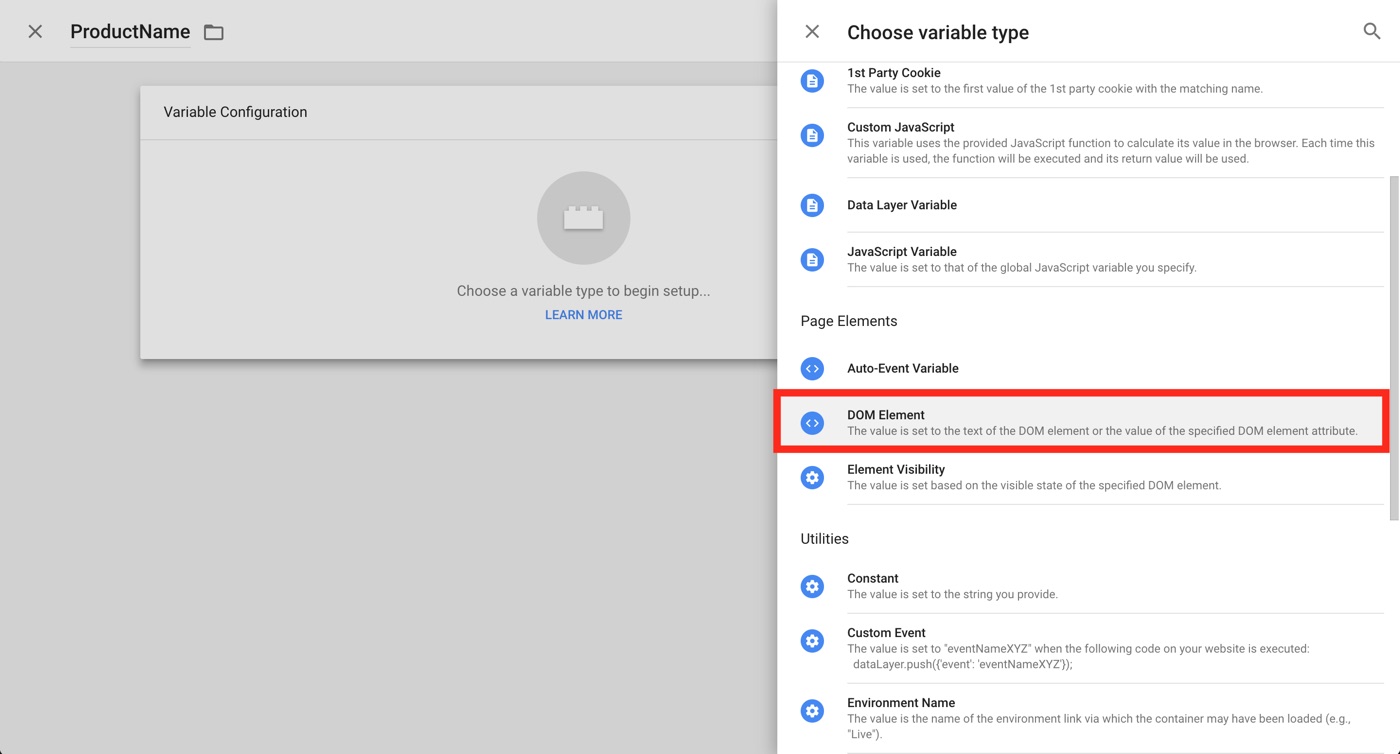
CSS Selector
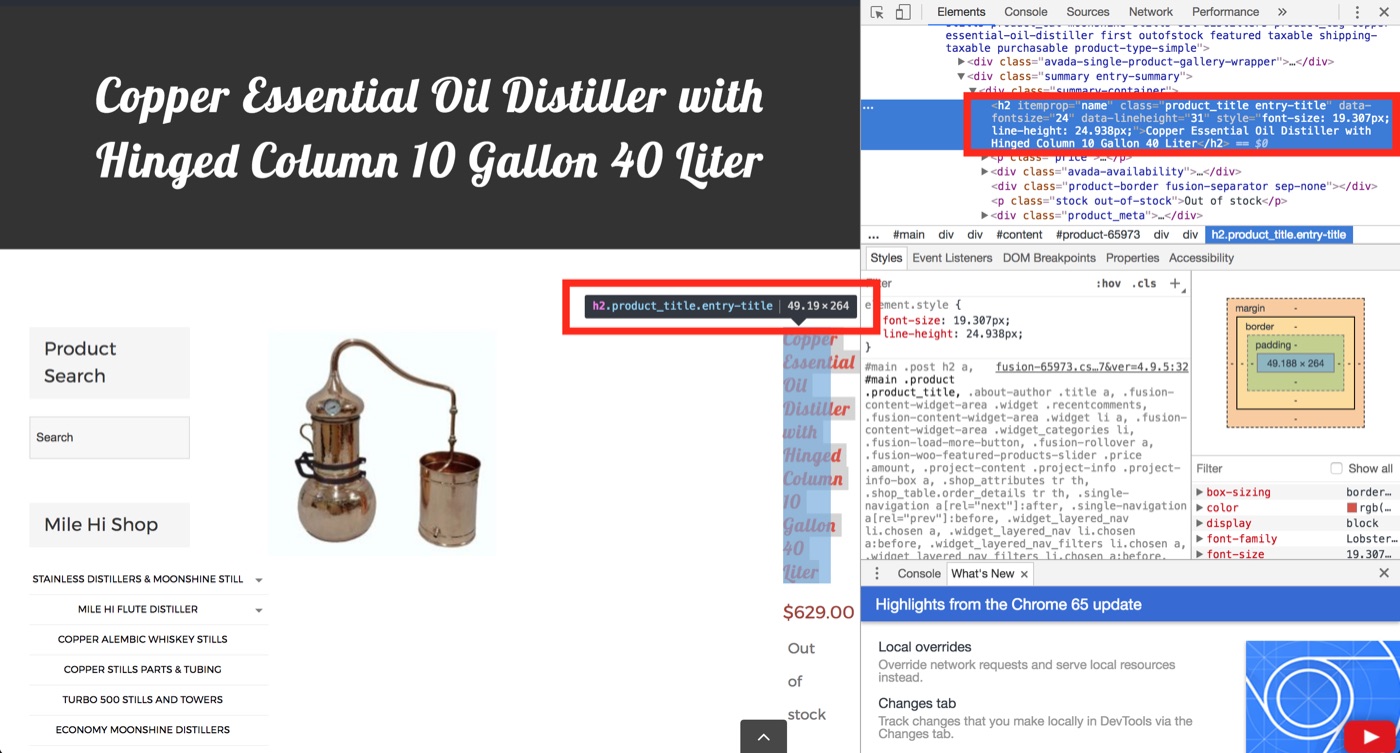
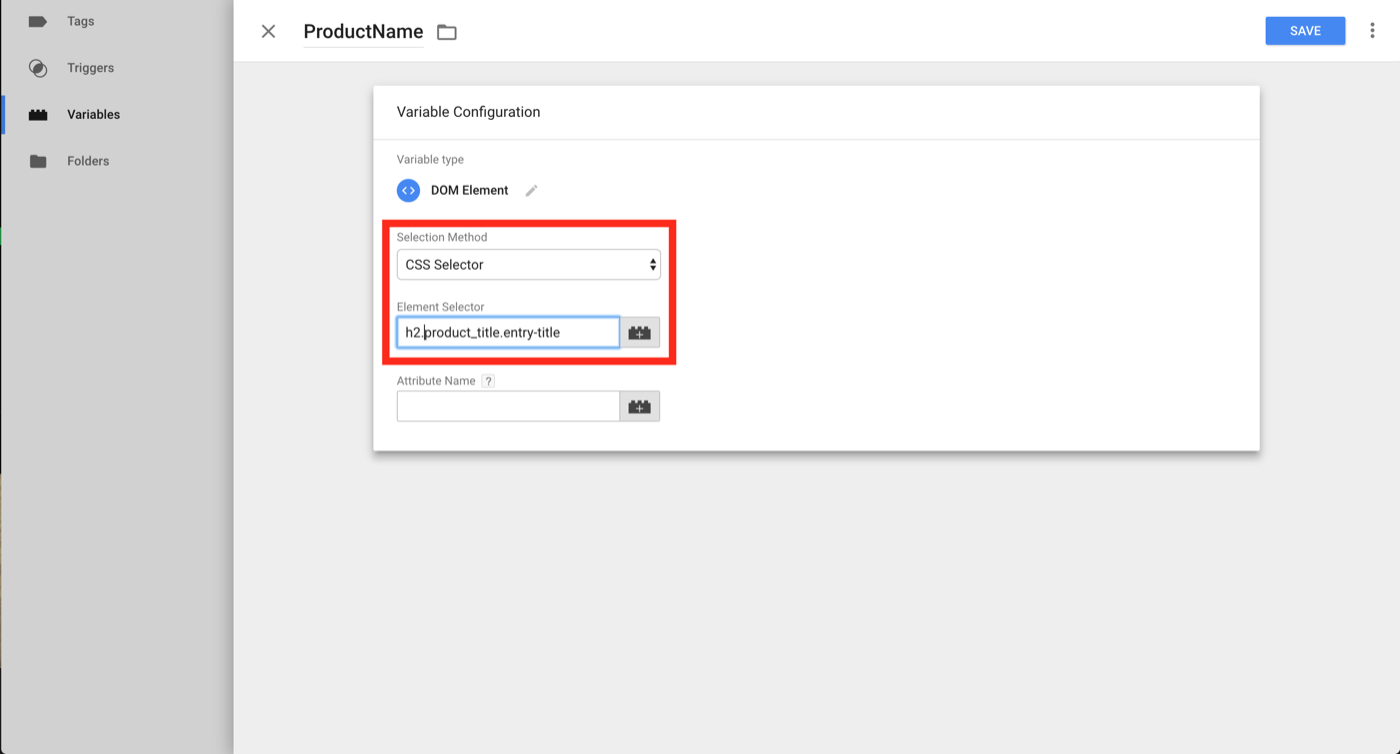
In order to find the correct element on the page for each variable that you set up, you’ll need to use the inspect tool to look at the source code of the page. For this example, we are setting up a user-defined variable to target the product name. As you can see below, the product name element can be selected using: h2.product_title.entry-title. So you can take that code and enter it into the ‘Element Selector’ box. Click ‘Save’ and we’ll move onto getting this variable added to the corresponding schema tag.
Inspect On-Page Elements
Element Selector
Custom Javascript Variables
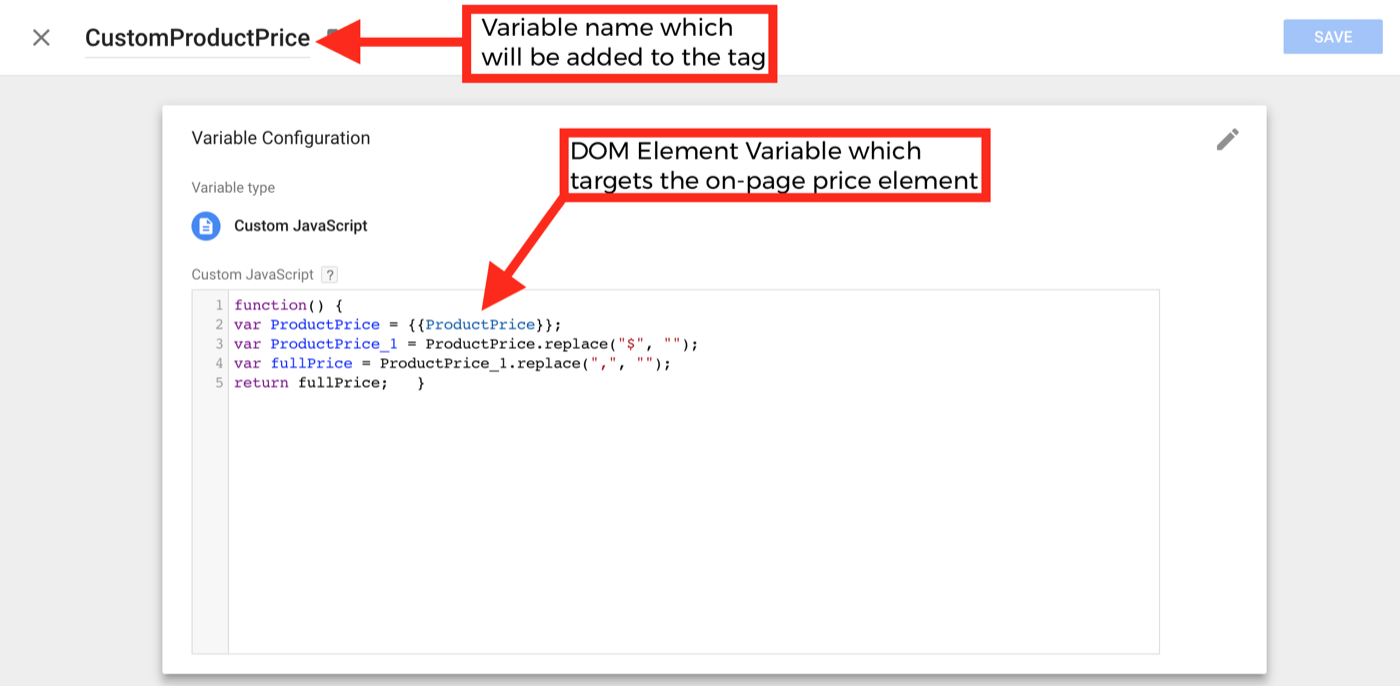
Custom Javascript variables will be used to add price, sale price and product image to your schema markup tag. The reason that we need to employ custom javascript functions for these specific variables is because they contain ‘$’, and ‘,’
These symbols are not valid price specifications according to https://schema.org/price. So you need to remove the ‘$’ and the ‘,’ in any price that you are targeting on-page.

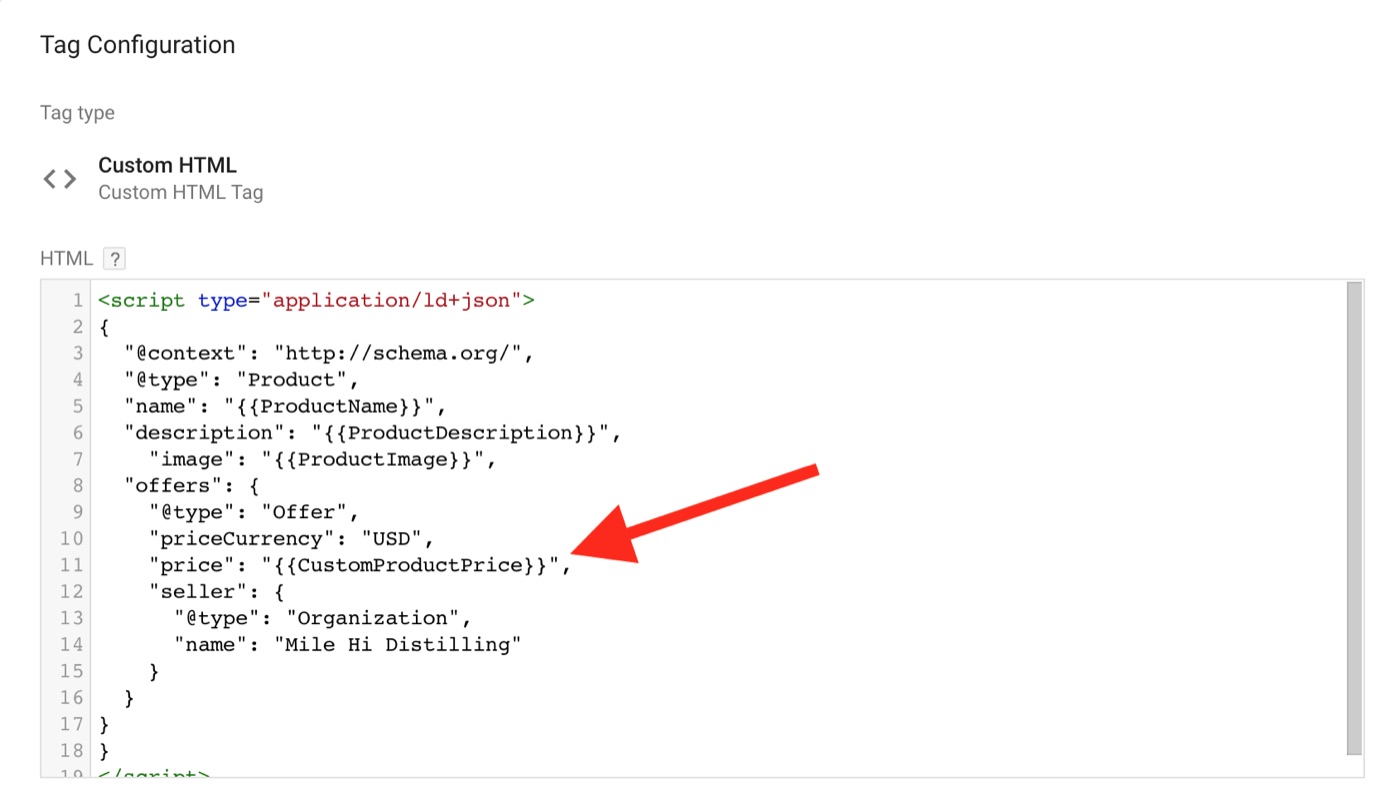
You will need to setup a DOM Element variable to target the product price and then an additional custom javascript variable to remove the ‘$’ and ‘,’ after the fact. Below is an example of the custom javascript function that we use for the product price schema. Instead of adding the ‘ProductPrice’ DOM Element variable to your schema tag (which would result in ‘$’ and ‘,’ errors), you will add the ‘CustomProduct Price’ custom javascript variable to your schema tag. Consequently, this will ensure that your product’s schema is error free the price section.
Custom Javascript Variable Function
Custom Product Price Variable In Tag
Place Variables Into Custom HTML Within Tags
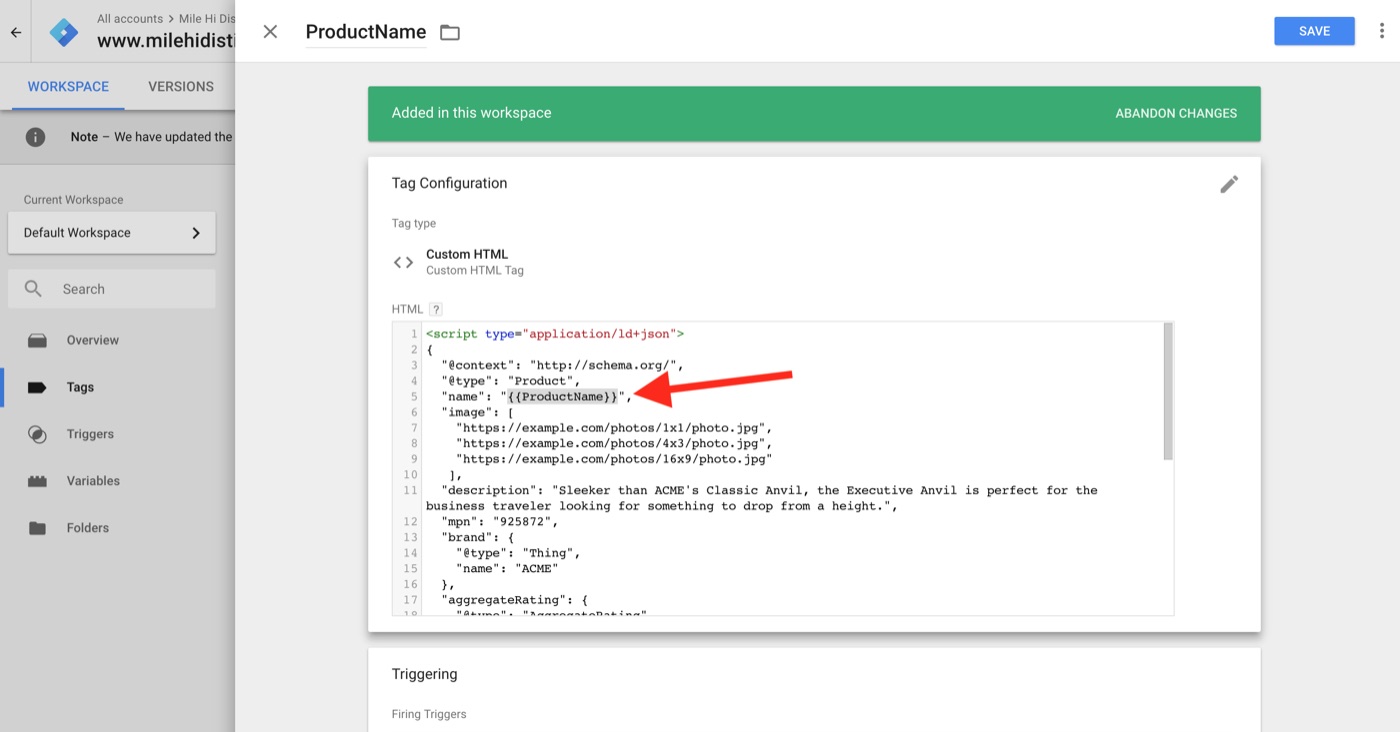
Next, we'll be taking the variable that you just created and add it to the custom HTML text box within the tag that you created earlier. This step is pretty easy, so don't worry. Basically you'll add the 'ProductName' variable into the line for, you guessed it, the 'product name'. You just need to wrap the variable name in double curly braces, like {{ProductName}}. See the screenshot below to clarify.
Add ‘ProductName’ Variable Into HTML JSON-LD
You’ll want to set up a user-defined variable for each piece of info that you’d like to markup with schema. For example on a product page, you may want to create a separate variable for each of the following:
- Product Description
- Product Image
- Aggregate Rating Value
- Aggregate Review Count
- The Review Author
- Review Date Published
- The Review Description
- Review Rating Value
- Price
- Sale Price
For each of these you will be able to locate the on-page element selector code using the inspect function in your browser. Like we mentioned earlier, you will need to use custom javascript as well as the DOM element to target the price, sale price and image. Below is an example of one of the JSON-LD HTML tags that we employ user-defined variables in order to dynamically add schema markup to our product pages.
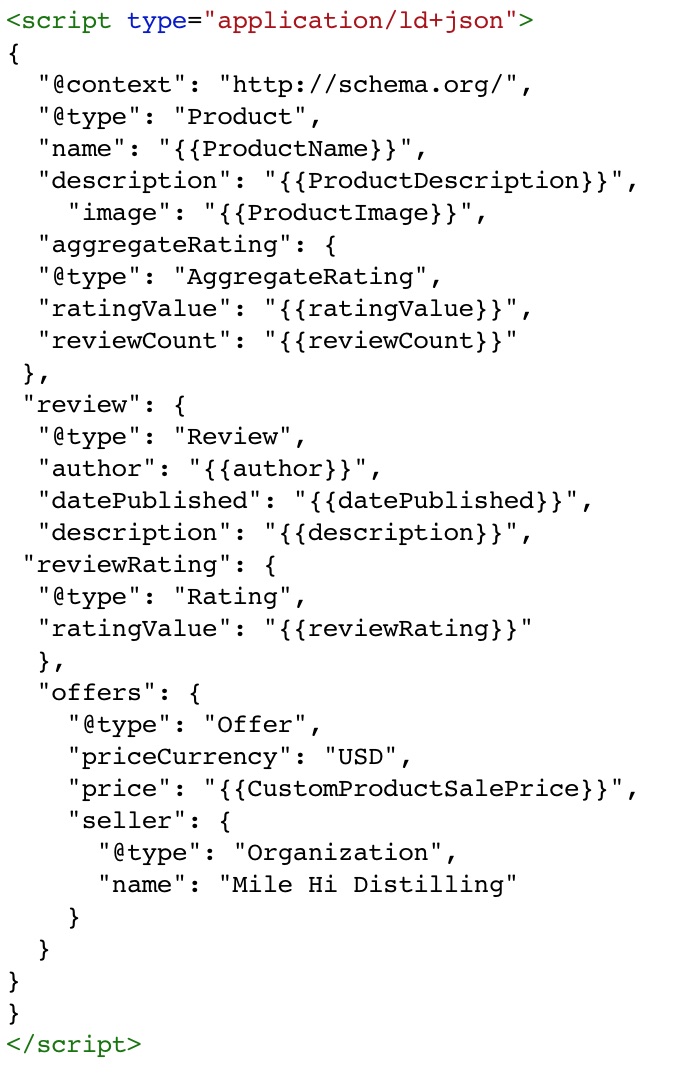
We also set up and employ a few other tags to account for the different variations of products ie. Products with reviews, products without reviews, sale products with reviews, sale products without reviews, etc.. Each one of these needs its own complete HTML Tag because for example, say you have a product on your site which is on sale and has no reviews.
If you were to use the above code you would end up with schema errors and incorrect information in your markup (which again is a no-no). The price reported in the schema markup would be the original price instead of the sale price and the schema markup for the reviews would report ‘null’ since there isn’t anything to target on page for a product with no reviews.
Therefore, it is very important that you always test your schema markup especially when it is being dynamically added to multiple pages. We’ll cover that in the next section.
Test Your Tags In Preview Mode
You can test your tags to make sure they are targeting the correct on-page elements and marking up the appropriate schema for the applicable page using ‘preview mode.’ This will allow you to work out any of the bugs in your tags before publishing them and doing your final testing with Google’s Rich Results Test, which we’ll cover in the next section.
Activate Preview Mode


To use preview mode, click the ‘Preview’ button and enter the address of a product page on your site. Google Tag Manager opens that page in a new browser tab, connected to its debugging tool, Tag Assistant.
Preview Workspace
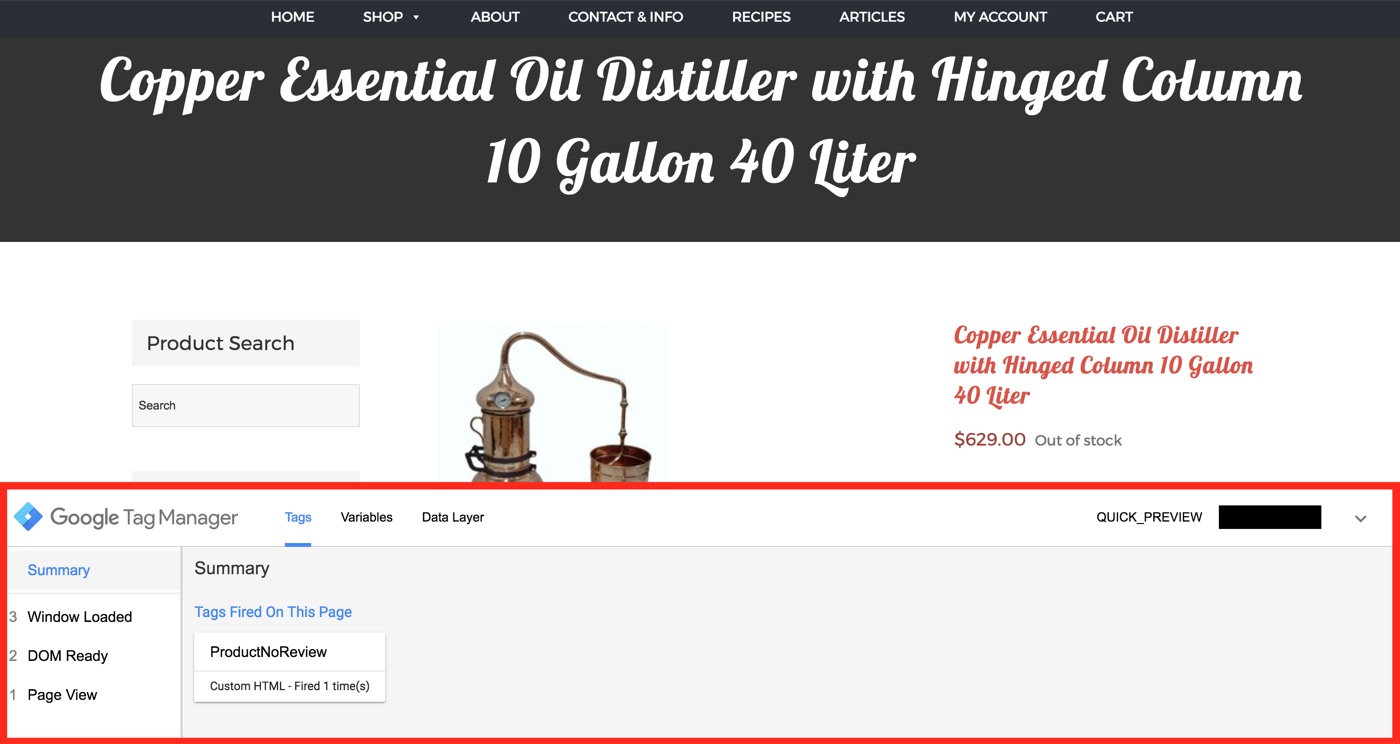
Switch back to the Tag Assistant tab to see what happened on the page. (The screenshots here show an older version of the Google Tag Manager interface; the steps are the same, but the layout has changed.)
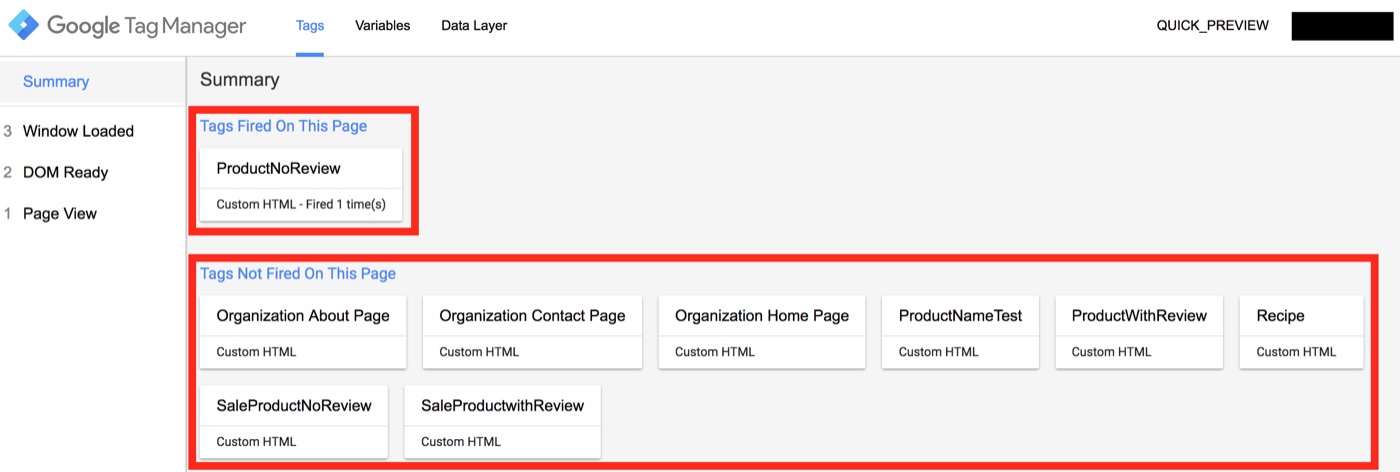
Tag Summary
Variable Values Returned
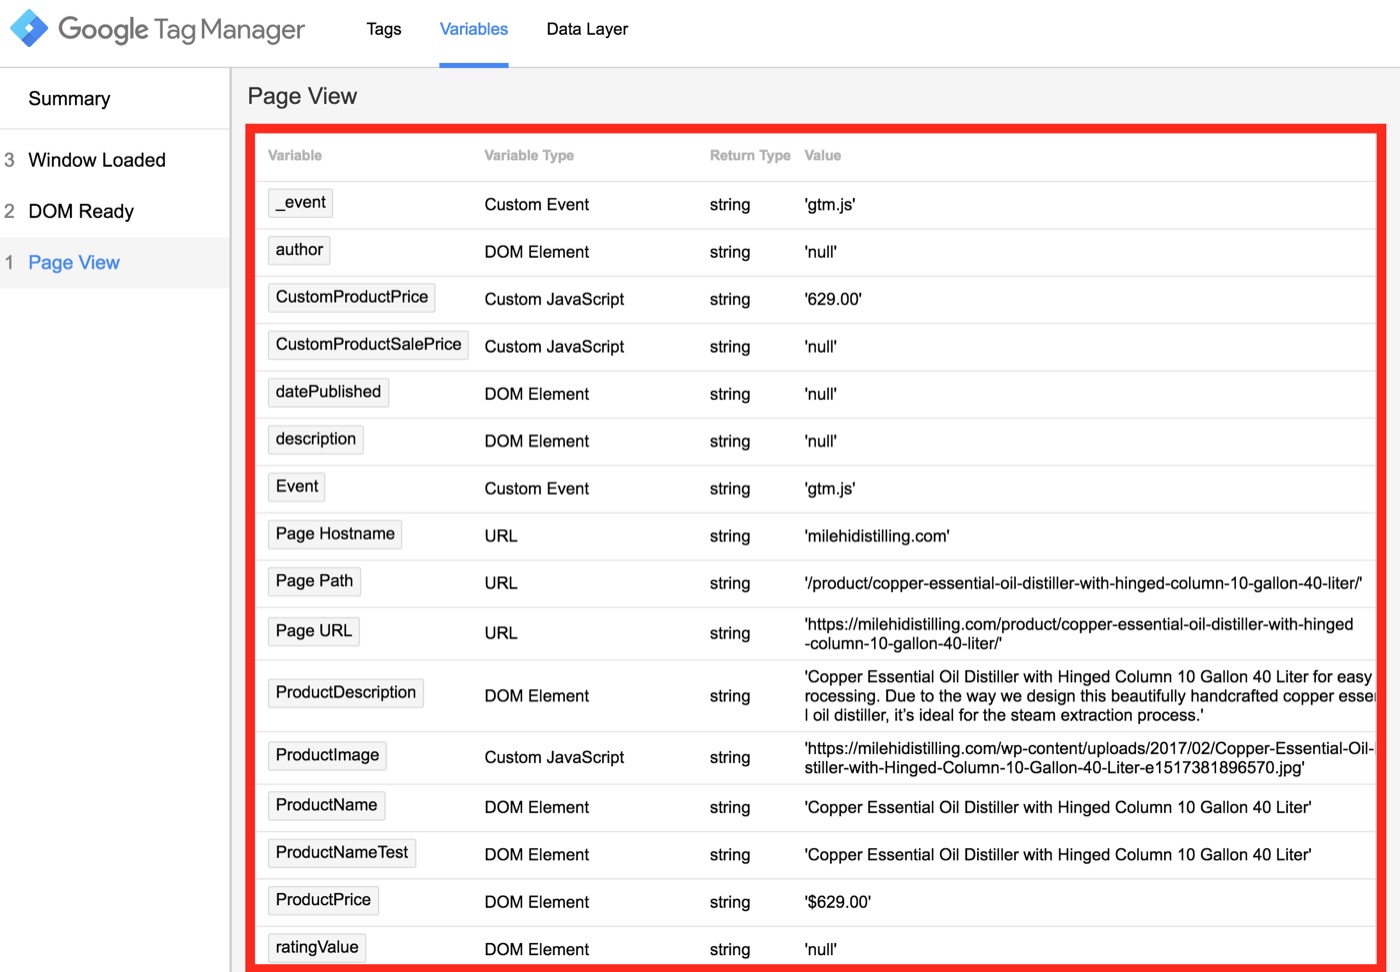
While in this area you can see which tags fired, which tags didn’t fire, the variable values that were returned and much more. Once you’ve verified that the correct tags fired and the correct set of variables has been targeted, you can leave preview mode and publish your changes in Google Tag Manager. Next we’ll run a final test on the live version of your schema.
Test Schema Markup With Google’s Rich Results Test
2026 update: the Structured Data Testing Tool shown in the screenshots below has been retired. Google replaced it with two free tools: the Rich Results Test, which checks whether your page qualifies for Google’s rich results, and the Schema Markup Validator, which checks any schema.org markup. The process below works the same way in both.
Testing is your last line of defense for double checking that your schema markup has been implemented correctly. It shows you the same information that preview mode did, except that now the schema/structured data is live on your site. If you see any errors or warnings in your schema markup at this point, you want to definitely take care of them as soon as possible so you can avoid any manual penalties from Google. Once your site is live, the Enhancements reports in Google Search Console will also flag schema errors across your whole site.
Test Your Structured Data
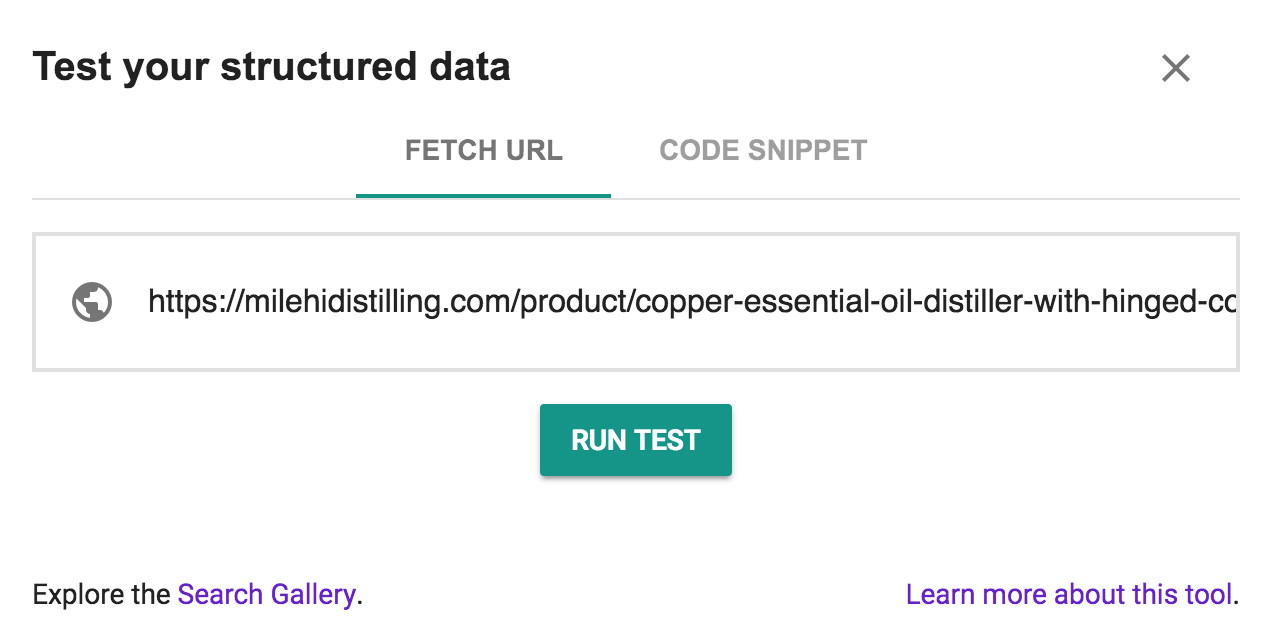
Enter a product page’s URL to run a final test of the dynamic schema markup that you just implemented.
Error/Warning Free Schema Markup
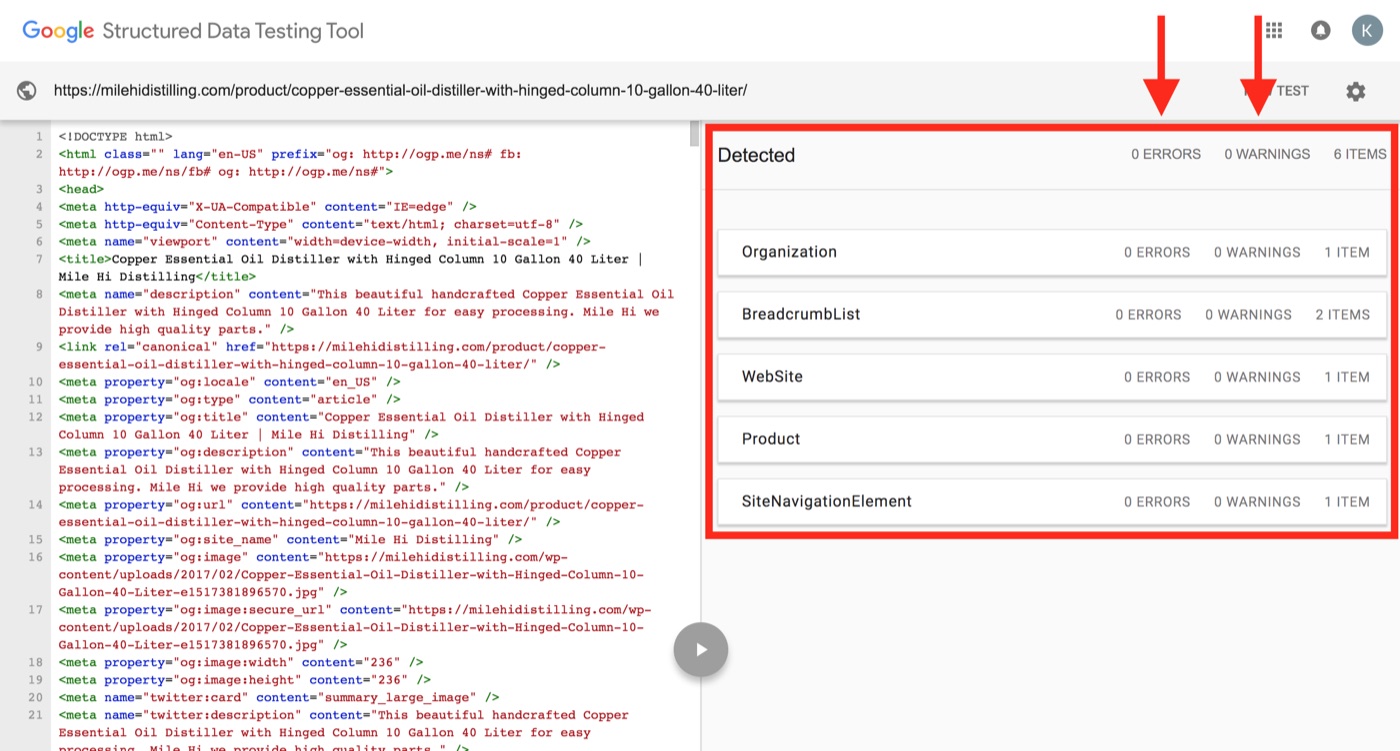
If you have zero errors and warnings then you’ve implemented the dynamic schema markup correctly. Congrats you smart person you! 😉
Clean Product Schema Markup
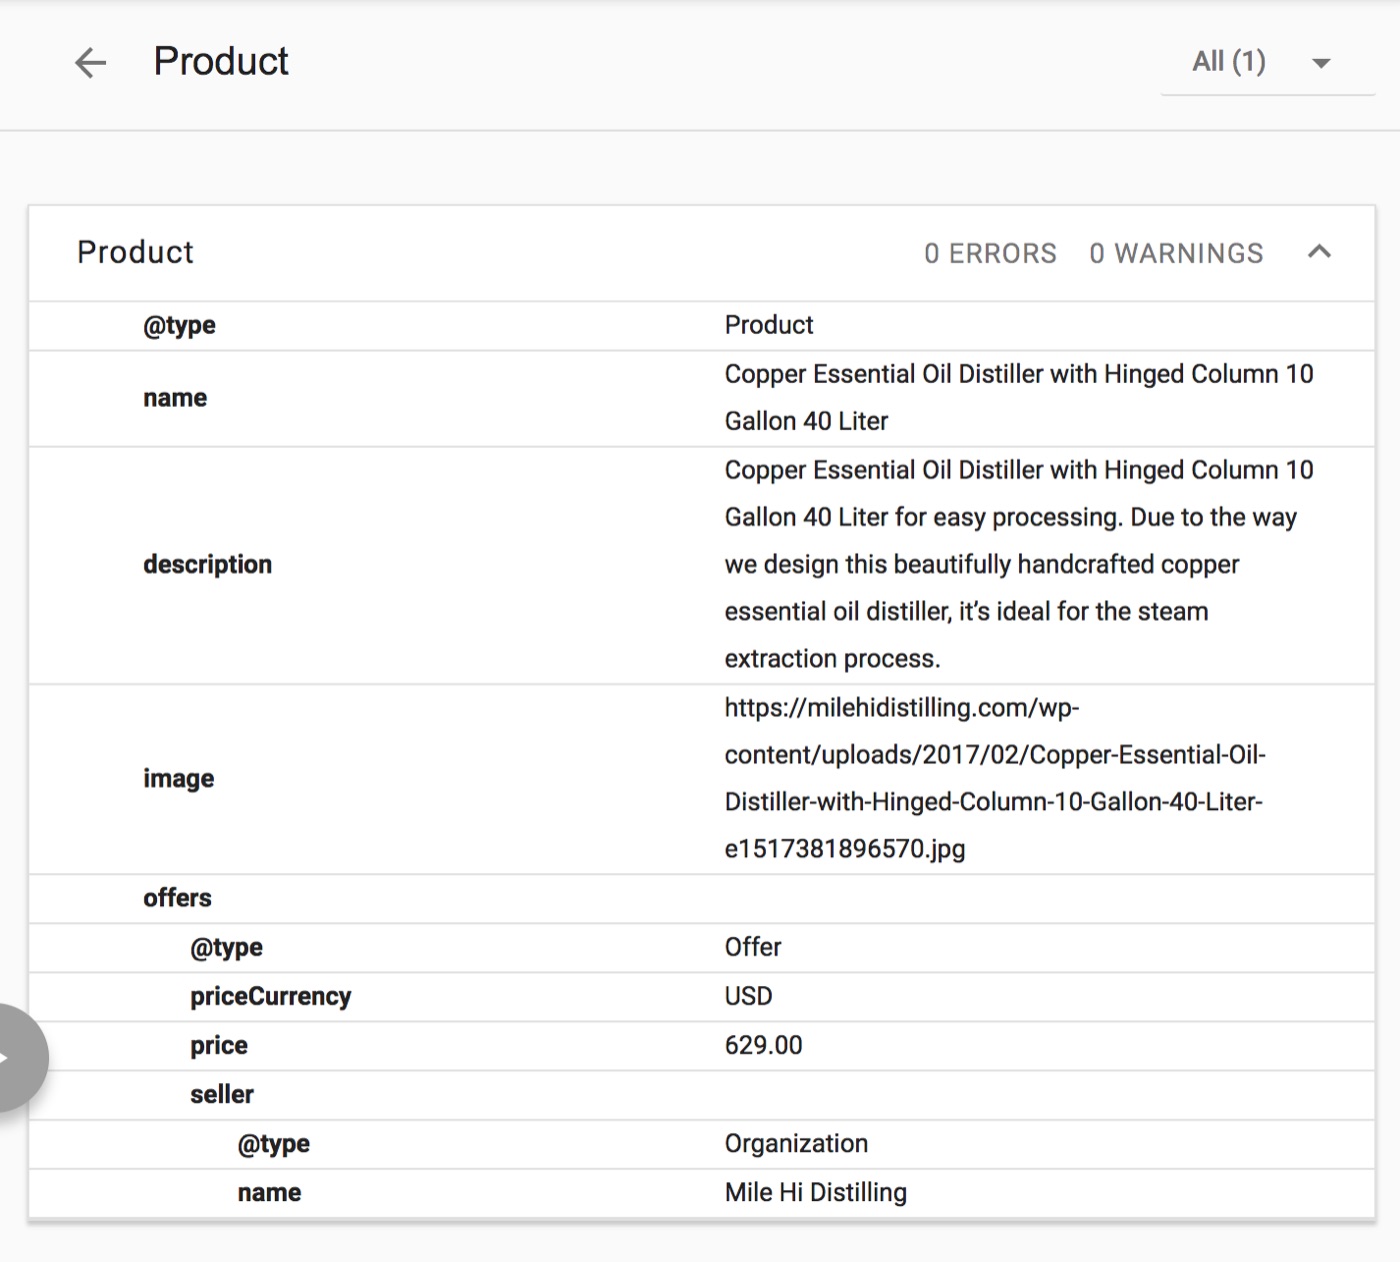
If you click on the product line, you can view the specific schema markup data in order to verify that it matches the on-page elements that users will see when they visit the page.
And there you have it! You just added dynamically generated schema markup for your website. This can be a very technical task to complete for your team. However, in the long term it will save you time and energy when adding schema markup to your site(s). If you have any questions about this process, get in touch.
Thanks for reading our schema markup and structured data guide. If you would rather have someone else do the technical work, just let us know. We are happy to add schema markup and structured data to your site. Just contact us and we’ll have your site marked up in no time.
Expert Contributions
These tips were contributed by industry experts when this guide was first published in 2018, and are shared here in their own words. Some tools they mention, like Google’s Structured Data Testing Tool, have since been retired. For testing today, use the Rich Results Test or Schema Markup Validator.
Adam Connell – Founder of Blogging Wizard
Structured data can be tricky, and even time-consuming to implement. As a solopreneur, there are a lot of tasks that demand attention. So I was keen to find an easier way to implement structured data, which didn’t involve messing around with code.
Fortunately, because I use WordPress to power my site, I was able to find a plugin to accomplish this. There are a number of plugins on the market. Some are geared more towards review sites, and others are a perfect fit for sites that don’t publish reviews. All supporting most of the popular types of rich snippets. A good starting point, is this tutorial we published on Blogging Wizard a while back.
Tim Fitzpatrick – Rialto Mobile Marketing
For WordPress websites, we love the WP SEO Structured Data Schema plugin. It’s very easy to use and makes implementation of structured data on your website a breeze.
Katie Keith – Co-Founder of Barn2 Media
Choose the simplest tool that will achieve what you’re looking for. If you’re already using the Yoast SEO plugin (and let’s face it – most people are!) then it has built-in tools to add Schema markup about your site search, site name, logo and social profiles. Just add this information on the Yoast plugin settings. If your site contains something more specific such as events, reviews or WooCommerce products, then the All In One Schema Rich Snippets plugin is excellent and lets you add schema for a huge range of content types.
Rafay – wpkube.com
If you have video content then use YouTube if you want to see your video show up in the SERPs. YouTube gets the top spots in Google results page for video results. I also recommend using JSON-LD for adding Schema.org markup to your pages instead of Microdata because it’s a simpler implementation. Google Structured Data Markup Helper and Google Structured Data Testing Tool are must-have tools for anyone looking to implement schema markup on their website.
Sachin Reddy – TechmediaGuide.com
Nowadays Search rankings are very hard to achieve. So we should not neglect any of the ranking factors of Google. Though Google says Schema markup is not the ranking factor. But it is indirectly a ranking factor. Because Implementing schema markup can improve Click through rate and User experience On SERP. As we know CTR is one of the major ranking factors in google one cannot neglect Schema markup.
Tanner King – JustinCollier.com
SCHEMA markup is a complicated, but necessary facet of improving your site’s rankings. The complicated part becomes especially true if you didn’t build your site with SCHEMA and structured data in mind, meaning that you have a lot of existing pages that don’t currently have it implemented. To make it easier, I recommend using Schema App’s WordPress plugin. The free version covers all blog posts and the home page of a site, but they also offer plenty of paid options to make it site-wide. Pro-tip: Make sure to enable the “Show Test Schema” option in the settings to add a handy button to your admin bar. When clicked, it takes you to Google’s Structured Data Testing Tool for that page, allowing you to easily check whether your page is properly structured.
Gennaro – Wordlift.io
Schema.org markup today is critical because it allows you to point to Google and other leading search engines what your web page is about. Where backlinks and keywords have become less relevant Schema markup is now a critical strategy. There are a few practical things I’ve set up for my AI-powered SEO strategy:
- an internal vocabulary that helps me address specific long-tail keywords that my audience is searching for
- add Schema markup on the pages of my site dynamically in a JSON-LD format, which loads asynchronously from the page; this does not affect the performance of the page (I do it with WordLift as it does it in a few clicks and without a line of code)
- publish the metadata in the 5-star open data scheme which allows search engines to understand the context of the site
Those steps are critical because back in 2012 Google started to build up a knowledge graph that is intended to represent the knowledge it finds on the web. Thanks to Schema markup and Open Linked Data you can make that content more easily “indexed” within the so-called Google’s knowledge vault. Besides that, following this strategy also gives you more control over what you want search engines to know about your site. If you want to see how to implement those strategies feel free to book a call with me.
Tolga Savas – RankYa
Best way to add Structured Data is by coding (mainly using JSON-LD) code because almost all plugins available on the current market fall short when it comes to fully take advantage of what Structured Data. Typically, since Schema Markup vocabulary is always evolving, and since Structured Data is all about structuring the website HTML elements to include data types (for example: products, reviews) that major search engines like Google now support, is great opportunity for all website owners to present their website prominently in Google search results.
There are tools made available by Google for website owners who do not want to invest in professional services by presencemedia.io. Tools which site owners can use is Structured Data Markup Helper and also Google Search Console Data Highlighter (although both tools do similar things, its preferred for website owners to use Structured Data Markup Helper. In all cases, the future of Google search will increase its support for Structured Data and reward website owners who use it.
Vashishtha Kapoor – VashishthaKapoor.com
When it comes to integrating schema markup on my website, I use WP Review plugin for review rich snippet.
As you already know that there are many kinds of rich snippet that Google is able to show in SERP, I prefer All in one Schema.org plugin.
The main reason is not just to show rich snippets on the search result page but also to present data in a manner that is adding value to the user’s knowledge. I would suggest catering the best content to your readers and forget of rankings. Provide value to your customers. They will be loyal to you and you grow with them.
Jessie Low – Whitespark.ca
Structured data is only as useful as the features it drives in search. If you’re a local business, you need to implement structured markup data that showcases elements that are valuable to your brick and mortar business, at a very minimum you should be implementing markup data that include: Business Name, Logo, Address, Phone Number, Hours and Geo-location Information (coordinates and map). It’s also well worth considering marking up Reviews, Business Description, and Social Profile Links (via the sameAs property).
When it comes to marking up your reviews to get those lovely review stars (rich snippets) in the SERP’s, it’s important to follow the rules:
2026 note: Google has since tightened these rules. Review stars no longer appear in search results for reviews a business publishes about itself (for example, reviews of your own company on your own website).
*These ones are mandatory and somewhat enforceable:*
Don’t use aggregateRating on your home page (they just won’t work and may be a spam signal)
aggregateRating score must represent actual reviews that are all visible on your site
If you don’t show the actual reviews on a given page, but are using aggregateRating schema, that page needs to clearly show the review score and link to the page where the reviews are visible
Pages you put the aggregateRating score on must be relevant to the reviews
Reviews should be unique to your site (not pulled from Google, Yelp, etc.)
Note: you can put 3rd party reviews on your website, you just can’t mark them up for your rich snippet.
*These ones are less enforceable, but still worth trying to oblige:*
You shouldn’t curate reviews (if you do, at least throw in a few 3’s and 4’s)
You should have the user’s permission to publish their words
Users should be able to add reviews (or at least make it look like they can)
Click here to learn more about marking up reviews for local businesses.
Varun Sharma – KVRwebtech.com
Schemas are really helpful in telling the search engine about the structure of your webpage so that search engines can show your page in SERPs for relevant queries.
But the shocking thing is that, still there are businesses which do not use schemas for their website and even don’t even know the various types of schemas they can use for their business.
I personally check the schemas as per my business and the create codes with the help of schema.org. Here you will find the different formats for coding like Microdata, RDFa and JSON-LD.
Once I create the schemas, I test them with the help of Google Schema Testing Tool and then implement the same.
One thing that everyone should remember is that, just implementation of schemas will not guarantee that your website will start appearing in the SERPs. It takes time and even there are several reasons of rich snippets are not appearing in SERPS which I have mentioned in my blog post here.
At the end , the best tip I can give is, create the relevant schemas for your website, implement it as per Google’s norms and be patient to see the results.
Divij Mehta – Websitesnmore.com.au
Schema markup if used correctly can really help a business boost their click-through-rate. As an agency dealing mostly with small to medium-sized businesses, we highly recommend the local business schema and the ratings/reviews schema. The rating schema allows businesses to show their star ratings on the SERP’s thus allowing them to stand out from the crowd.
If you utilise a popular open-source Content Management System (CMS) such as WordPress, Joomla Magento or Drupal, there are plenty of plugins/extensions/modules that can be used to activate schema markup on your website. With these plugins, you don’t require any technical skills to implement schema markup on your website.
Here are some of our favourite plugins/extensions for open-source CMS’s,
1- WordPress – All In One Schema.org or Rich Snippets WordPress Plugin
2- Joomla – Google Structured Data Markup
3- Magento – Rich Snippets Suite
4- Drupal – Schema.org